For years I’ve been volunteering at a non-profit – and for quite some time the folks working in one particular spot have been looking for a printer. It was never really a dire need, so we never ran out and bought one for this location. Recently, we were cleaning out an office and found an old HP LaserJet P1505, and a new toner cartridge, still sealed in the box. Of course, that’s a USB-only printer, and it was more than a little dirty. So, I brought it home, and put in an hour or so cleaning it up.
I wanted to park this printer in a building where a small handful of folks would be able to print to it, so sharing is of course a must. Since it’s USB-only, that means something’s got to be connected to it full-time, sharing it to clients on the network. The big question – what to connect for that?
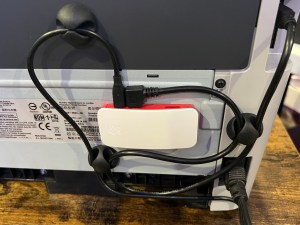
As luck would have it, I had a spare Raspberry Pi Zero W in the drawer. It’s starting to show its age – it doesn’t run more current 64-bit Linux releases, but it does have a pretty up-to-date Raspberry Pi OS (formerly called Raspbian) based on Debian Bullseye in the 32-bit armhf flavor. I used the standard Raspberry Pi imager tool from their site, and dropped the latest “OS Lite” image on an SD Card I was ready to roll. Once upon a time, networking used to have be configured after the fact in a text file, and there was a pre-defined user (pi) with the password raspberry on the device. These days, you can set all those parameters before you image the card, including a custom username, password, and even, hostname. SO. MUCH. NICER.
So, I grabbed my roll of 3M VHB tape, some cable management ties and sticky things, and got to work. You can see the results up above. Configuration was pretty easy. Just a few commands to get things installed, and before I knew it, I had smartened up this fairly dumb printer.
Raspberry Pi OS (really Debian) installs a pretty reasonable default CUPS configuration, with only minimal changes needed to do remote administration to it. Once that stuff is done, you can even flip the configs right back if you like. To get things up and going…
sudo apt update
sudo apt install cups hplip
sudo usermod -aG lpadmin <your username>
At this point, you should log out, and log back in to refresh your group assignments. Once logged back in, if your printer isn’t plugged in and turned on, now’s the time. You can check to make sure it’s seen by issuing the lsusb command. In my case, with the HP LaserJet P1505, I required the HPLIP drivers, which in turn require the proprietary HP modules, to be downloaded from HP. The hplip package comes with a tool to do this, called hp-setup. I recommend the simplest process here – just invoke it interactively – sudo hp-setup -i. The tool will see your printer, reach out to HP, figure out what to grab, and offer to do the rest automatically. The defaults are sane, and you can pretty much just let it do its thing. Once the tool has downloaded everything, you can proceed to CUPS configuration.
There are only 2 lines to change, and 2 to add in the default CUPS configuration in /etc/cups/cupsd.conf. The changes are on lines 18 and 22, and the additions are found around line 34.
Change From This:
# Only listen for connections from the local machine.
Listen localhost:631
Listen /run/cups/cups.sock

# Show shared printers on the local network.
Browsing No
BrowseLocalProtocols dnssd
To This (note highlights):
# Only listen for connections from the local machine.
Port 631
Listen /run/cups/cups.sock

# Show shared printers on the local network.
Browsing On
BrowseLocalProtocols dnssd
Change/Add From This:
# Restrict access to the server...
<Location />
  Order allow,deny
</Location>

# Restrict access to the admin pages...
<Location /admin>
  Order allow,deny
</Location>
To This (note highlights):
# Restrict access to the server...
<Location />
  Order allow,deny
  Allow @LOCAL
</Location>

# Restrict access to the admin pages...
<Location /admin>
  Order allow,deny
  Allow @LOCAL
</Location>
Alternatively, you could do something like ssh tunnel traffic to the host, but that’s a bit of a pain if you’re going to manage this longer term. If you want/need to lock this down tighter, don’t use the @LOCAL macro, be more specific in those Allow statements. Once you’ve made these changes, go ahead and restart CUPS with a sudo service cups restart.
At this point, you should be able to browse to http://ip.addr.of.pi:631/admin, and setup your printer. Go ahead and add that printer. You may be presented with multiple options for your printer. Make sure you pick the right one, or at least test it. For me, the HPLIP one makes the most sense, and works best (i.e. at all, in my case). With the printer configured and shared in CUPS, the system automatically installed avahi as a dependency while installing everything earlier. What’s the big deal? Well, you’ve now got automatic setup available for Windows 10, 11, macOS, iOS, and iPadOS. That sounds like a pretty good deal to me! AirPrint works like a champ on an iPad, without any trouble either.
Armed with all this, you should be able to smarten up pretty much any USB-only printer. Just add whatever drivers you need, add the printer to CUPS, share it within CUPS, and you’re golden. Get on your PCs and Macs, add them as network printers. They should just show up because of Bonjour/Zeroconf, since avahi got auto-installed and configured with CUPS. AirPrint should also “just work” here too. Have fun!

You must be logged in to post a comment.