Building a Terminal Server from a Pi4

Sometimes in the world of networking, you just need console access to a device. Most of the time, it’s fine to connect in-band, over the network, but other times? You need to do stuff that takes that same network out of service, so out-of-band, or OOB is a must-have. To that end, most network devices offer serial console ports. Some use old-school DB9 connectors, others use an RJ45 jack, and many newer devices use USB-based console ports.

On the first 2 cases, you typically need some sort of USB serial adapter connected to your computer to make the connection. A couple of the most common chipsets used are the Prolific PL2303 family of chipsets, and the Silicon Labs CP210x family of chipsets. Interestingly, the USB-based console devices move that chipset out of an adapter and inside the network device. Hook up a USB-A (or -C) to Mini or Micro-USB cable, and you’re ready to connect to the device using the serial console app of your choice. Many of the latest devices have even shifted to USB-C for these onboard ports (and there was much rejoicing!)

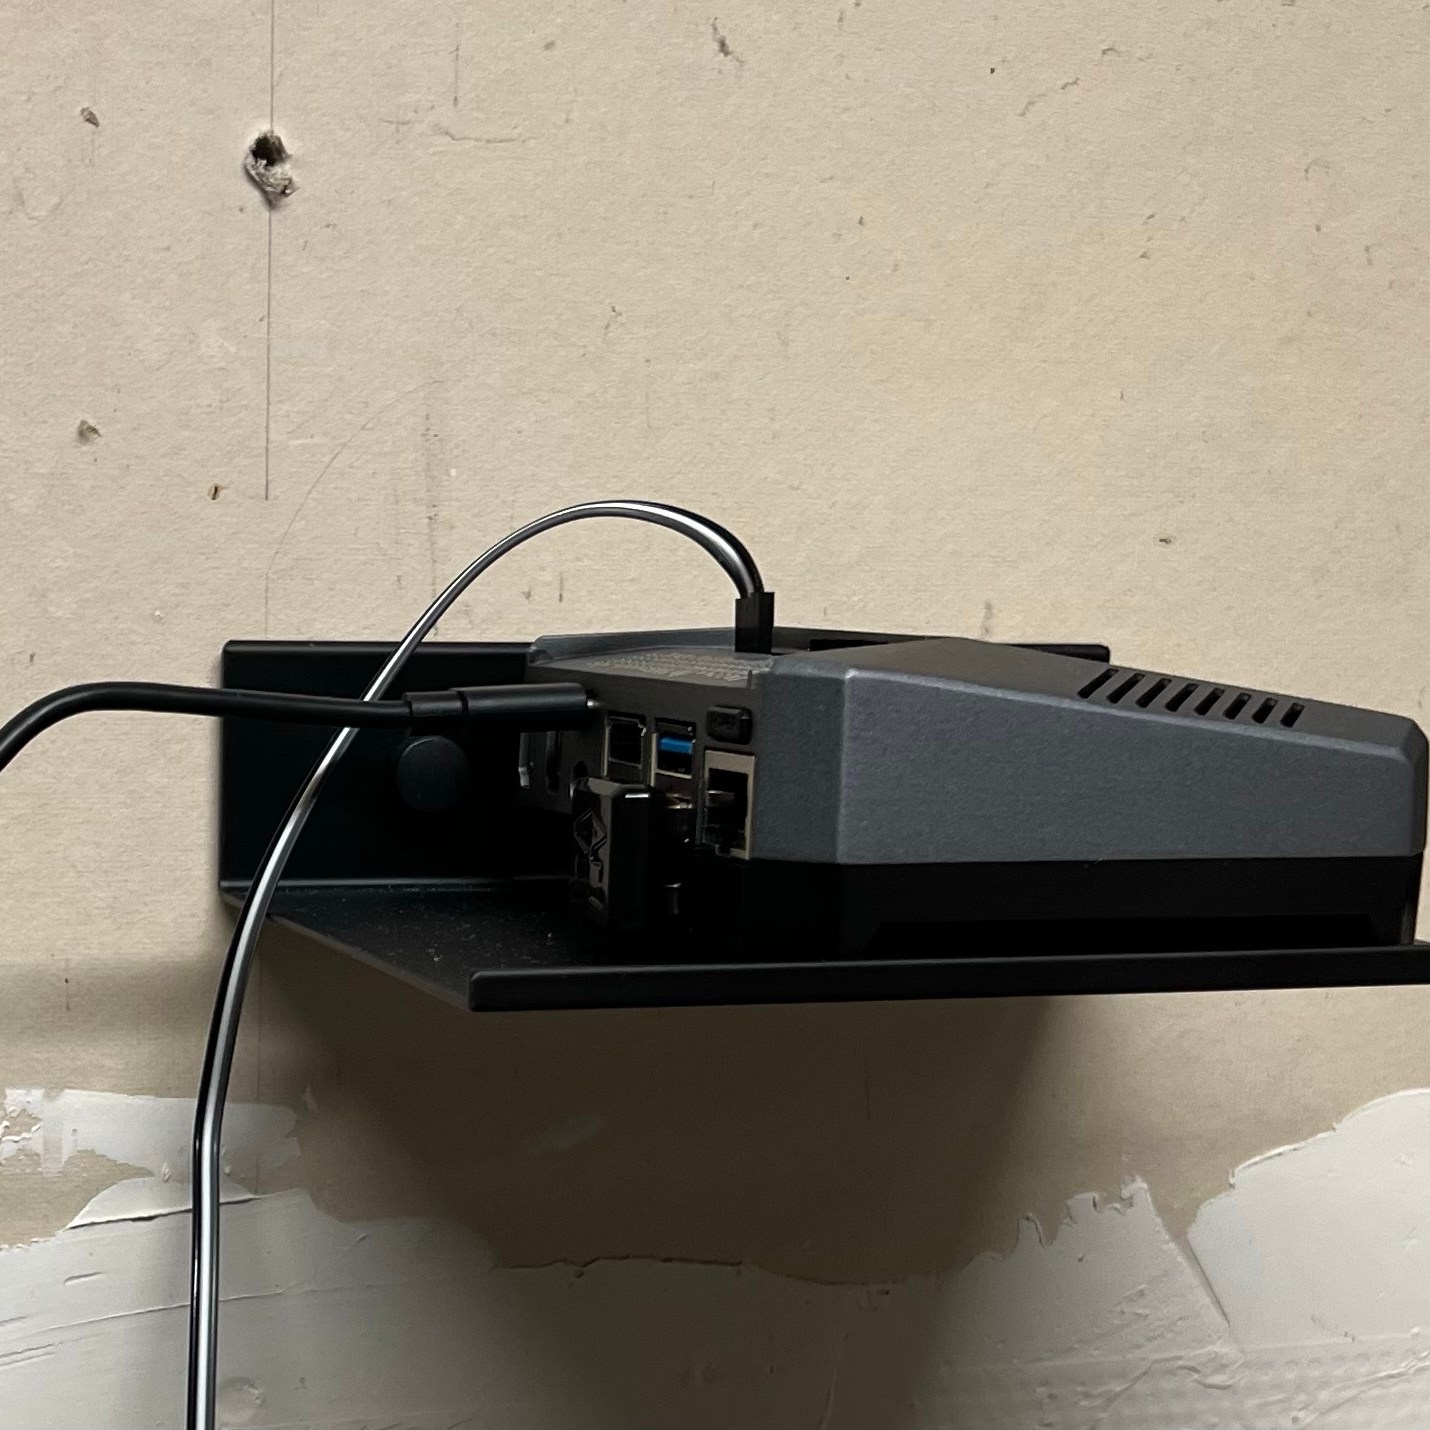
So, my requirement? I’ve got 5 things in the rack in my home office that have serial console ports. All but 1 of them offers the USB console option, all of which use the Mini-USB connector on the device. So, off to the IOT junk box I keep, scavenging for parts. I found a pre-COVID supply chain disaster Raspberry Pi 4 board with power supply and a USB 3.0 hub. Why the hub? Well, the Pi only has a small number of USB ports, and I need more devices connected, so the hub solves that issue. I decided to beef things up a bit with the Argon ONE M.2 case, so I could run the Pi from an M.2 SSD rather than an SD card. I tossed an M.2 SATA SSD in the basement of the case and went to work. Note – this case doesn’t support NVMe, so make sure you’re not trying to use it here. I installed the latest Ubuntu LTS release on the Pi (22.04 LTS) on an SD Card, transferred the system over to the SSD, changed the bootloader order, and removed the SD Card. All ready.

Next? Just a couple of packages. First up, ser2net. It’s exactly what it sounds like – it lets you bridge a serial port to the network. Most commonly, you expose the serial port so that you telnet to a special port number and boom, you’re connected. Being more security minded, I bind to the loopback and use ssh. More on that in a bit.

One thing that you do need to think about is predictable serial port device names. Linux turns up usb serial ports in the order they’re connected, as /dev/ttyUSB0, ttyUSB1, etc. The hitch here is that things don’t always register as connected in the same order. In other words, you can plug 2 ports in, and they can flip positions across reboots. So what do you do? The udev daemon comes to your rescue here. I found a great guide with procedures on finding all the appropriate parameters. In the end, you’re going to create a udev rules file to map your USB serial ports to persistent names. Here’s my /etc/udev/rules.d/99-usb-serial.rules file:

# switches - internal serial
SUBSYSTEM=="tty", ATTRS{idVendor}=="10c4", ATTRS{idProduct}=="ea60", ATTRS{serial}=="01373013", SYMLINK+="con-sw0-shire"
SUBSYSTEM=="tty", ATTRS{idVendor}=="10c4", ATTRS{idProduct}=="ea60", ATTRS{serial}=="01373118", SYMLINK+="con-sw1-shire"

# prod and lab firewalls - internal serial
SUBSYSTEM=="tty", ATTRS{idVendor}=="10c4", ATTRS{idProduct}=="8470", ATTRS{serial}=="04350063E4F5", SYMLINK+="con-fw-rivendell"
SUBSYSTEM=="tty", ATTRS{idVendor}=="10c4", ATTRS{idProduct}=="8470", ATTRS{serial}=="0435005004C4", SYMLINK+="con-lab-fangorn"

# lab router - dongle
SUBSYSTEM=="tty", ATTRS{idVendor}=="067b", ATTRS{idProduct}=="2303", SYMLINK+="con-lab-isengard"

Once you’ve got that file in place, run the following command to cause udevd to recognize the new config and put the symlinks in-place: sudo udevadm control --reload-rules && sudo udevadm trigger.

Got your persistent device names in-place? Ok, it’s time to configure ser2net. Here’s my /etc/ser2net.yaml.

%YAML 1.1
---
define: &banner \r\n\o [\d]\r\n\r\n

connection: &rivendell
    accepter: telnet(rfc2217),tcp,127.0.0.1,7000
    connector: serialdev,/dev/con-fw-rivendell,9600n81,local
    options:
      banner: *banner

connection: &switch0
    accepter: telnet(rfc2217),tcp,127.0.0.1,7001
    connector: serialdev,/dev/con-sw0,9600n81,local
    options:
      banner: *banner

connection: &switch1
    accepter: telnet(rfc2217),tcp,127.0.0.1,7002
    connector: serialdev,/dev/con-sw1,9600n81,local
    options:
      banner: *banner

connection: &fangorn
    accepter: telnet(rfc2217),tcp,127.0.0.1,7003
    connector: serialdev,/dev/con-lab-fangorn,9600n81,local
    options:
      banner: *banner

connection: &isengard
    accepter: telnet(rfc2217),tcp,127.0.0.1,7004
    connector: serialdev,/dev/con-lab-isengard,115200n81,local
    options:
      banner: *banner

The next piece of the puzzle? Access to those consoles from across the network. I’m handling this with some additional sshd instances. This requires 2 bits of additional config to get going. First, additional config files in /etc/ssh, 1 per additional instance. These instances are configured to telnet to the appropriate localhost-bound console port upon successful connect. As a matter of course, I also turn off PasswordAuthentication, which means no tunneled cleartext passwords, and enable Challenge-Response auth. Naturally, authenticating with certificates is enabled.

Include /etc/ssh/sshd_config.d/*.conf

Port 4000
PasswordAuthentication no
#PermitEmptyPasswords no
ChallengeResponseAuthentication yes

UsePAM yes
PrintMotd no
PidFile /run/sshd_4000.pid

AcceptEnv LANG LC_*

ForceCommand telnet localhost 7000

The last piece, which is completely optional? Setup a WiFi AP on the Pi. I’ve not written up that piece here, as there are plenty of guides on doing that. Be aware of one point though – hostapd and the networkd configuration renderer are incompatible at this time. The solution is to either define your interface in /etc/network/interfaces.d/wlan0, or make sure your netplan config is using NetworkManager as the renderer.

Automatic Deployment of Let’s Encrypt Certs

Many of you already use Let’s Encrypt certificates in various capacities to provide secure connectivity to applications and devices. Most of the time, these apps and devices automatically reach out, get certs issued, installed and everything just works. That’s cases like traefik, or certbot with apache/nginx, etc.

Then there are those “other” use cases you’ve got. Like say, a custom certificate for a Plex server, or maybe even something more exotic like a certificate for an HP printer. How do you take care of those in an automated, “hands-off” sort of way? How do you make it work so that you’re not having to set reminders for yourself to get in there and swap out certs manually every 3 months? Because you know what’s going to happen right? That reminder’s going to go off, you’re going snooze it for a couple of days, then you’ll tick that checkbox, saying, “yeah, I’ll do it after I get back from lunch” and then something happens and it never gets done. Next thing you know, the cert expires, and it becomes a pain in the rear at the worst possible moment.

That’s where deploy-hooks come into play. If you’ve got a script that can install the certificate, you can call that script right after the cert has been issued by specifying the --deploy-hook flag on the certbot renew command. Let’s look at an example of how we might add this to an existing certbot certificate that’s already setup for automatic renewal. Remember, automatic renewal and automatic installation are different things.

First, we’ll do a dry-run, then we’ll force the renewal. It’s really that easy. Check it:

sudo certbot renew --cert-name printer.mynetwork.net --deploy-hook /usr/local/sbin/pcert.sh --dry-run

Once this process is completed, the automatic renewal configuration for printer.mynetwork.net will include the deploy-hook /usr/local/sbin/pcert.sh. But, what does that really mean? Upon successful renewal, that script will execute, at which point, you’re (presumably) using the script to install the newly refreshed certificate. In this case, the script is unique to that particular certificate. It’s possible to have deploy-hooks that are executed fro EVERY cert as well, by dropping them in the /etc/letsencrypt/renewal-hooks/deploy directory.

For some examples, check out the ones I’m using. Especially interesting (to me at least) is the HP Printer script. That one took a bit of hackery to get working. I had to run the dev tools, and record the browser session a couple of times to get all the variable names straight, and so forth, but once I had it down, it was a snap. Now when the Let’s Encrypt cert updates, within a few seconds, I’ve got the latest cert installed and running on the printer!

What certs will you automate the installation of?

The Dryer Update…

[Any Amazon Links below are Non-Affiliate Links that just go to Amazon Smile]

So, if you think back a bit, you may recall that I was using a Pi 4 for my IoT project that monitored the dryer, shooting out Telegram group messages to the whole family when the dryer was done with the laundry.

Times being what they are, it’s pretty difficult to come by a new Raspberry Pi these days, as I’m sure many of you know. I needed the power of the Pi 4 for something else, at least on a temporary basis. Meanwhile, back at the ranch, a couple of months prior, I’d received a ping from the Micro Center about 45 minutes away informing me that they had a handful of Pi Zero 2 W’s on hand. Those little suckers are super hard to find, so I snapped up my max of 2, along with the GPU I’d been dying to lay hands on for the longest time. For those who care, I finally got an EVGA 3080. Pandemics and supply-chain constraint conditions suck, by the way, in case you were wondering my position on that issue.

So, having my Pi Zero 2 W in the drawer ready to roll, I unscrewed the box from the way that housed the Pi 4, fitted the sensor I had directly onto the Pi Zero 2 W, and scaled down from a 2-project-box solution down to 1 box. Sadly, it sucked. But, it wasn’t the hardware’s fault. In reality it was totally a self-inflicted condition.

I modified (slightly) the pins on the old 801s sensor I had, fitted it onto that new Pi Zero 2W (since it didn’t have any GPIO pin headers soldered on), and sort of Rube-Goldberged it together using 3M VHB tape inside the project box. Total hack job. I thought about using a bunch of hot glue, but then I thought better of it. Why not solder? Honestly? I suck at soldering. One of these days I’ll get around to getting good at it. But that’s not today.

It was wildly unstable. The sensor kept on moving, losing contact with the side of the GPIO holes, it was awful. I all but gave up. I had a brief flirtation with the Aqara Smart Hub and one of their Zigbee Vibration sensors, and believe me, when I say brief, I mean like 12 hours. It just wasn’t fit for the job.

My grand plan with that was to mimic what I was doing over on the washer – write some Python code and run it in a container to query an API somewhere in the cloud every X seconds to see if the thing was vibrating or not, then based on that, work out the state of the dryer to determine if the dryer had started or stopped and then act accordingly. But alas, since step 2 in this plan was a klunker, steps 3 through infinity? Yeah, those never happened.

So, back to the drawing board. I found that I couldn’t easily lay hands on a new 801s again, and the project for the Pi4 was now finished, so I had that back. I did find a new vibe sensor – the SW-420. 3 pins instead of 4, but it’s still a digital output that works fine with the Pi, and my existing code worked as-is, so who cares, right? Yeah, I classed the thing up quite a bit more this time too. This time, instead of shoving the Pi inside a project box that’s mounted on the wall running from the SD card, I opted to run in one of those snazzy Argon One M.2 SSD cases booting Ubuntu 22.04 from an M.2 SSD in the basement of the case. I’ve got that sitting on a lovely little shelf mounted just above and behind the dryer, with my 3 GPIO leads running out of the top of the case, directly into the small project box that’s attached to the front of the dryer, inside which is the sensor, which is stuck to the inside of the box using 3M VHB tape. The box itself is stuck to the dryer using VHB tape as well.

In the end, all’s well that ends well. I’ve had to do a good bit more tuning on the SW-420 sensor. It’s been a bit more fiddly than the old 801s was. That one was definitely a plug and play affair. This has required a bit of adjustment on the little potentiometer that’s built into the sensor. Not too bad though. I’ve invested probably a total of 15 minutes of time standing next to the dryer, staring at telemetry, while the dryer is running, or not. But in the end, it’s all working, and the notifications are happening once again.

One Crazy Summer

Hey automators!

Summer’s been absolutely nuts. Between work stuff, family stuff, running here and there, and of course, the odd project or two, I’ve been just plain stretched for time.

Stay tuned. I’ll be coming back around shortly. I’m working on some things. Preview?

Well, Remember how Logitech decided that the Harmony Remote, one of the best things ever to happen to the world of universal remotes was going to be taken out back and killed? Yeah, I was pretty mad about that too. So, I went looking for something else to solve some automation challenges with that. So, that’s coming.

What else? Tried to buy a Raspberry Pi lately? Heh. Yeah, me too. I decided to try a different fruit for a change. So far, so good. More on that later.

More still? There’s an update on that printer situation. The dryer too.

How about a Raspberry Pi-based network console server for my network equipment?

Hang in there family, it’s coming.

Smartening Up An Old Printer

Pi Zero W on back of printer
Pi Zero W on Back of the Printer

For years I’ve been volunteering at a non-profit – and for quite some time the folks working in one particular spot have been looking for a printer. It was never really a dire need, so we never ran out and bought one for this location. Recently, we were cleaning out an office and found an old HP LaserJet P1505, and a new toner cartridge, still sealed in the box. Of course, that’s a USB-only printer, and it was more than a little dirty. So, I brought it home, and put in an hour or so cleaning it up.

I wanted to park this printer in a building where a small handful of folks would be able to print to it, so sharing is of course a must. Since it’s USB-only, that means something’s got to be connected to it full-time, sharing it to clients on the network. The big question – what to connect for that?

As luck would have it, I had a spare Raspberry Pi Zero W in the drawer. It’s starting to show its age – it doesn’t run more current 64-bit Linux releases, but it does have a pretty up-to-date Raspberry Pi OS (formerly called Raspbian) based on Debian Bullseye in the 32-bit armhf flavor. I used the standard Raspberry Pi imager tool from their site, and dropped the latest “OS Lite” image on an SD Card I was ready to roll. Once upon a time, networking used to have be configured after the fact in a text file, and there was a pre-defined user (pi) with the password raspberry on the device. These days, you can set all those parameters before you image the card, including a custom username, password, and even, hostname. SO. MUCH. NICER.

So, I grabbed my roll of 3M VHB tape, some cable management ties and sticky things, and got to work. You can see the results up above. Configuration was pretty easy. Just a few commands to get things installed, and before I knew it, I had smartened up this fairly dumb printer.

Raspberry Pi OS (really Debian) installs a pretty reasonable default CUPS configuration, with only minimal changes needed to do remote administration to it. Once that stuff is done, you can even flip the configs right back if you like. To get things up and going…

sudo apt update
sudo apt install cups hplip
sudo usermod -aG lpadmin <your username>

At this point, you should log out, and log back in to refresh your group assignments. Once logged back in, if your printer isn’t plugged in and turned on, now’s the time. You can check to make sure it’s seen by issuing the lsusb command. In my case, with the HP LaserJet P1505, I required the HPLIP drivers, which in turn require the proprietary HP modules, to be downloaded from HP. The hplip package comes with a tool to do this, called hp-setup. I recommend the simplest process here – just invoke it interactively – sudo hp-setup -i. The tool will see your printer, reach out to HP, figure out what to grab, and offer to do the rest automatically. The defaults are sane, and you can pretty much just let it do its thing. Once the tool has downloaded everything, you can proceed to CUPS configuration.

There are only 2 lines to change, and 2 to add in the default CUPS configuration in /etc/cups/cupsd.conf. The changes are on lines 18 and 22, and the additions are found around line 34.

Change From This:

# Only listen for connections from the local machine.
Listen localhost:631
Listen /run/cups/cups.sock

# Show shared printers on the local network.
Browsing No
BrowseLocalProtocols dnssd

To This (note highlights):

# Only listen for connections from the local machine.
Port 631
Listen /run/cups/cups.sock

# Show shared printers on the local network.
Browsing On
BrowseLocalProtocols dnssd

Change/Add From This:

# Restrict access to the server...
<Location />
  Order allow,deny
</Location>

# Restrict access to the admin pages...
<Location /admin>
  Order allow,deny
</Location>

To This (note highlights):

# Restrict access to the server...
<Location />
  Order allow,deny
  Allow @LOCAL
</Location>

# Restrict access to the admin pages...
<Location /admin>
  Order allow,deny
  Allow @LOCAL
</Location>

Alternatively, you could do something like ssh tunnel traffic to the host, but that’s a bit of a pain if you’re going to manage this longer term. If you want/need to lock this down tighter, don’t use the @LOCAL macro, be more specific in those Allow statements. Once you’ve made these changes, go ahead and restart CUPS with a sudo service cups restart.

At this point, you should be able to browse to http://ip.addr.of.pi:631/admin, and setup your printer. Go ahead and add that printer. You may be presented with multiple options for your printer. Make sure you pick the right one, or at least test it. For me, the HPLIP one makes the most sense, and works best (i.e. at all, in my case). With the printer configured and shared in CUPS, the system automatically installed avahi as a dependency while installing everything earlier. What’s the big deal? Well, you’ve now got automatic setup available for Windows 10, 11, macOS, iOS, and iPadOS. That sounds like a pretty good deal to me! AirPrint works like a champ on an iPad, without any trouble either.

Armed with all this, you should be able to smarten up pretty much any USB-only printer. Just add whatever drivers you need, add the printer to CUPS, share it within CUPS, and you’re golden. Get on your PCs and Macs, add them as network printers. They should just show up because of Bonjour/Zeroconf, since avahi got auto-installed and configured with CUPS. AirPrint should also “just work” here too. Have fun!

Embracing Simplicity. Again. This time, it’s DNS.

Public Enemy #1

I, like many, hate DNS. I tolerate it. It’s there because, well, I need it. There’s just only so many IP addresses one can keep rattling around inside one’s head, right? So, it’s DNS.

For years, I ran the old standard, BIND under Linux here at home. My old BIND config did a local forward to dnscrypt-proxy, which ran bound to a port on localhost, and then in turn pushed traffic out to external DNS servers like Cloudflare’s 1.1.1.1 or IBM’s 9.9.9.9. I didn’t think my ISP was entitled to be able to snoop on what DNS lookups I was doing. They still aren’t entitled to those, so I didn’t want to lose that regardless of what I ended up doing.

Out in the real world, my domain’s DNS was hosted by DNS Made Easy. They’ve got a great product. It’s reliable, and it’s not insanely expensive. It’s not nothing, but we’re not talking hundreds a year either. I think it’s about $50 a year for more domains and queries than I could possibly ever use. But, like many old schoolers, they’ve lagged behind the times. Yes, they’ve got things like a nice API, and do support DNSSEC, but DNSSEC is only available in their super expensive plans that start at $1700+ a year. That’s just not happening. So, I started looking around.

I landed on Cloudflare. They’ve got a free tier that fits the bill for me. Plenty of record space, a nice API, dare I say, a nicer API even. DNSSEC included in that free tier at no cost even. How do you beat free? I was using a mish-mash of internal and external DNS with delegated subdomains for internal vs external sites as well. It was (again) complicated – and a pain in the rear.

So, I registered a new domain to use just for private use. I did that through Cloudflare as well. As a registrar, they were nice to work with too. They pass that through at cost. Nice and smooth setup. So, internal stuff now consists of names that are [host/app].site.domain.net. Traefik is setup using the Cloudflare dns-01 letsencrypt challenge to get certs issued to secure it all, and the connectivity, as discussed before in the other post is all by Tailscale. The apps are all deployed using Docker with Portainer. The stacks (ok, they’re just docker-compose files) in Portainer are all maintained in private GitHub repos. I’ll do a post on that in more detail soon.

Ok, so what did I do with the DNS at home? Did I just ditch the resolver in the house entirely? I did not. In the end I opted for dumping BIND after all these years and replacing it with Unbound. I had to do a bit of reading on it, but the configuration is quite a bit less complex, since I wasn’t configuring zone files any more. I was just setting up a small handful of bits like what interfaces did I want to listen to, what did I want my cache parameters to look like, and what did I want to do with DNS traffic for the outside world, which pretty much everything is? In my case, I wanted to forward it to something fast and secured. I was already crushing pretty hard on Cloudflare, so 1.1.1.1 and 1.0.0.1 were easy choices. I’m also using IBM’s 9.9.9.9 as well. All of those are forwarding out using DNS-over-TLS, and DoT, or sometimes DOT. It worked for me first try.

Then I grabbed the Ubuntu certbot snap and told it to grab a cert for dns.home.$(newdomain).net, which is attached to this moon. After I got the cert issued, it was a piece of cake to turn up both DNS over HTTPS and DNS over TLS, and DoH and DoT.

It was fairly easy to get DoH working on a Windows 11 PC. It was also super easy to craft an MDM-style config profile for DoT that works great on IOS and iPadOS devices. Microsoft has Apple beat cold in this department. Well, in the Apple wold, if you configure a profile for DoT (the only way you can get it in there) you’re stuck with it until you get rid of it – by uninstalling and reinstalling.

On Windows? It was as easy as setting your DNS servers to manual, then crack open a command prompt as Administrator and then (assuming your DNS server is 10.10.10.10)…

netsh dns add encryption 10.10.10.10 https://my.great.server/dns-query

Once you’ve done that, you’ll be able to choose from a list under where you punch in DNS settings in the network settings and turn on Encryption for your DNS connection. It’s working great!