Ok, so I built plugmon a while ago. It worked great. I loved it – super reliable, none of the fiddly nonsense I’ve had to work through with my vibration sensor-based dryer monitoring solution even. Sadly, the Etekcity smart plugs I used before, which used the (really nice) VeSync API no longer seem to be able to be purchased, easily at least.
So, what to do? If the code is to be useful long-term, we’ll need to change the platform to something that’s actually able to be purchased. Without question there’s no shortage of smart plugs available. So, what are desirable features that I’m after when looking for a different platform?
Naturally, I’m after some sort of way to easily talk to the plugs to read data. Of course, it also (should at least) goes without saying that we need a plug that offers the ability to monitor power use, as well as exposing some sort of API to allow use to get at that data without using the vendor’s app directly.
There’s a ton of options out there, but eventually, I landed with the Kasa (formerly TP-Link) plugs. Why? Two things really pushed them over the top. First of course was remote API-style access to the plug’s power monitoring data. But with the Kasa plugs one didn’t even need to go outside the home LAN to capture the data.
At the end of things, I kept the majority of code from jcostom/plugmon, grabbed a few bits of code from other projects I’ve worked on, and in about 30 minutes, the Washerbot was born.
It’s a shame that the VeSync plugs are now so difficult (impossible?) to come by. The API was reasonably easy to work with, and they weren’t terribly expensive either. I’m hopeful that TP-Link / Kasa Smart will be around for longer. I really like the “no outside connectivity” needed part of the python-kasa module as well.
Some may point out that there was a brief dust-up a couple of years ago with TP-Link, when they announced their intention to stop allowing local access to their devices, and you’d be right to do so. Fortunately, TP-Link was smart enough to take the not-so-subtle hints from the community, and walked that change back.
Without further ado, head over to GitHub and check out the new Washerbot code & container. Obviously, you’ll need one of the TP-Link plugs that provides energy use stats, like the KP115.
[Any Amazon Links below are Non-Affiliate Links that just go to Amazon Smile]
So, if you think back a bit, you may recall that I was using a Pi 4 for my IoT project that monitored the dryer, shooting out Telegram group messages to the whole family when the dryer was done with the laundry.
Times being what they are, it’s pretty difficult to come by a new Raspberry Pi these days, as I’m sure many of you know. I needed the power of the Pi 4 for something else, at least on a temporary basis. Meanwhile, back at the ranch, a couple of months prior, I’d received a ping from the Micro Center about 45 minutes away informing me that they had a handful of Pi Zero 2 W’s on hand. Those little suckers are super hard to find, so I snapped up my max of 2, along with the GPU I’d been dying to lay hands on for the longest time. For those who care, I finally got an EVGA 3080. Pandemics and supply-chain constraint conditions suck, by the way, in case you were wondering my position on that issue.
So, having my Pi Zero 2 W in the drawer ready to roll, I unscrewed the box from the way that housed the Pi 4, fitted the sensor I had directly onto the Pi Zero 2 W, and scaled down from a 2-project-box solution down to 1 box. Sadly, it sucked. But, it wasn’t the hardware’s fault. In reality it was totally a self-inflicted condition.
I modified (slightly) the pins on the old 801s sensor I had, fitted it onto that new Pi Zero 2W (since it didn’t have any GPIO pin headers soldered on), and sort of Rube-Goldberged it together using 3M VHB tape inside the project box. Total hack job. I thought about using a bunch of hot glue, but then I thought better of it. Why not solder? Honestly? I suck at soldering. One of these days I’ll get around to getting good at it. But that’s not today.
It was wildly unstable. The sensor kept on moving, losing contact with the side of the GPIO holes, it was awful. I all but gave up. I had a brief flirtation with the Aqara Smart Hub and one of their Zigbee Vibration sensors, and believe me, when I say brief, I mean like 12 hours. It just wasn’t fit for the job.
My grand plan with that was to mimic what I was doing over on the washer – write some Python code and run it in a container to query an API somewhere in the cloud every X seconds to see if the thing was vibrating or not, then based on that, work out the state of the dryer to determine if the dryer had started or stopped and then act accordingly. But alas, since step 2 in this plan was a klunker, steps 3 through infinity? Yeah, those never happened.
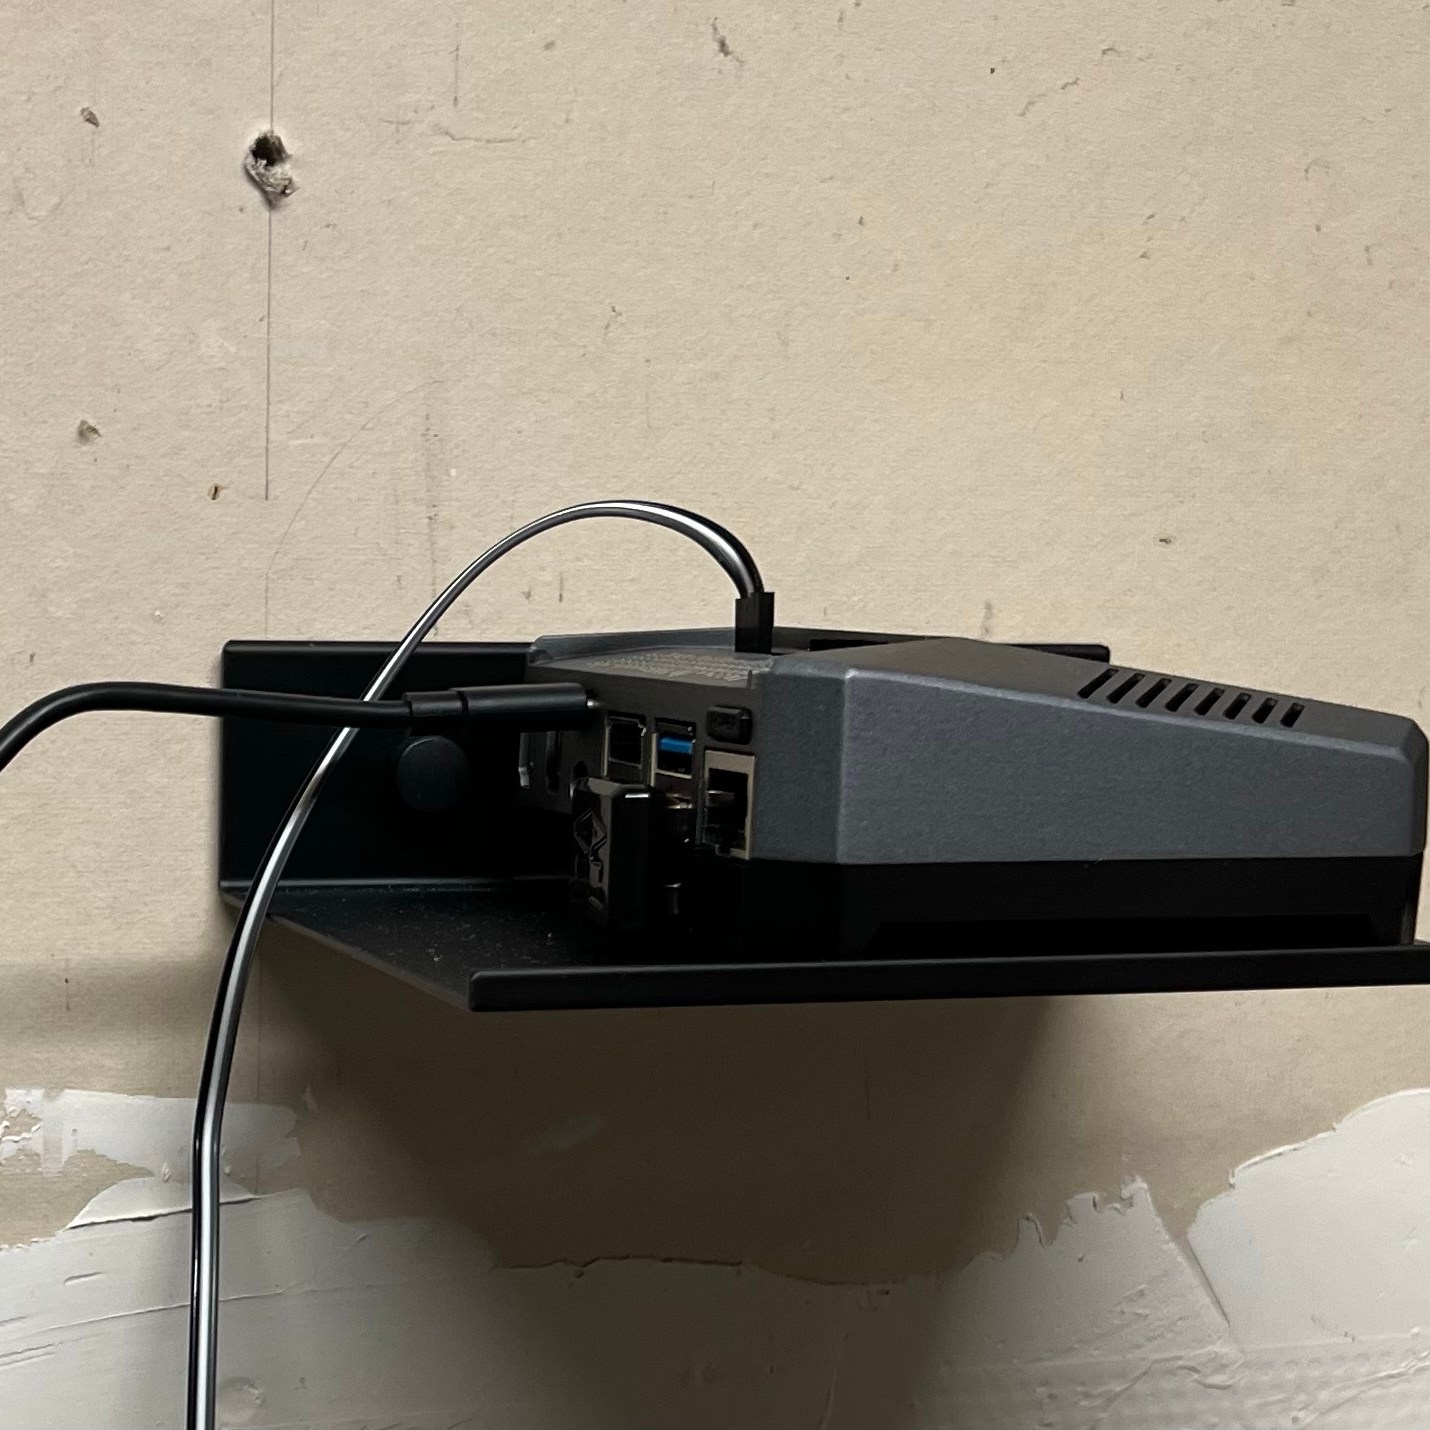
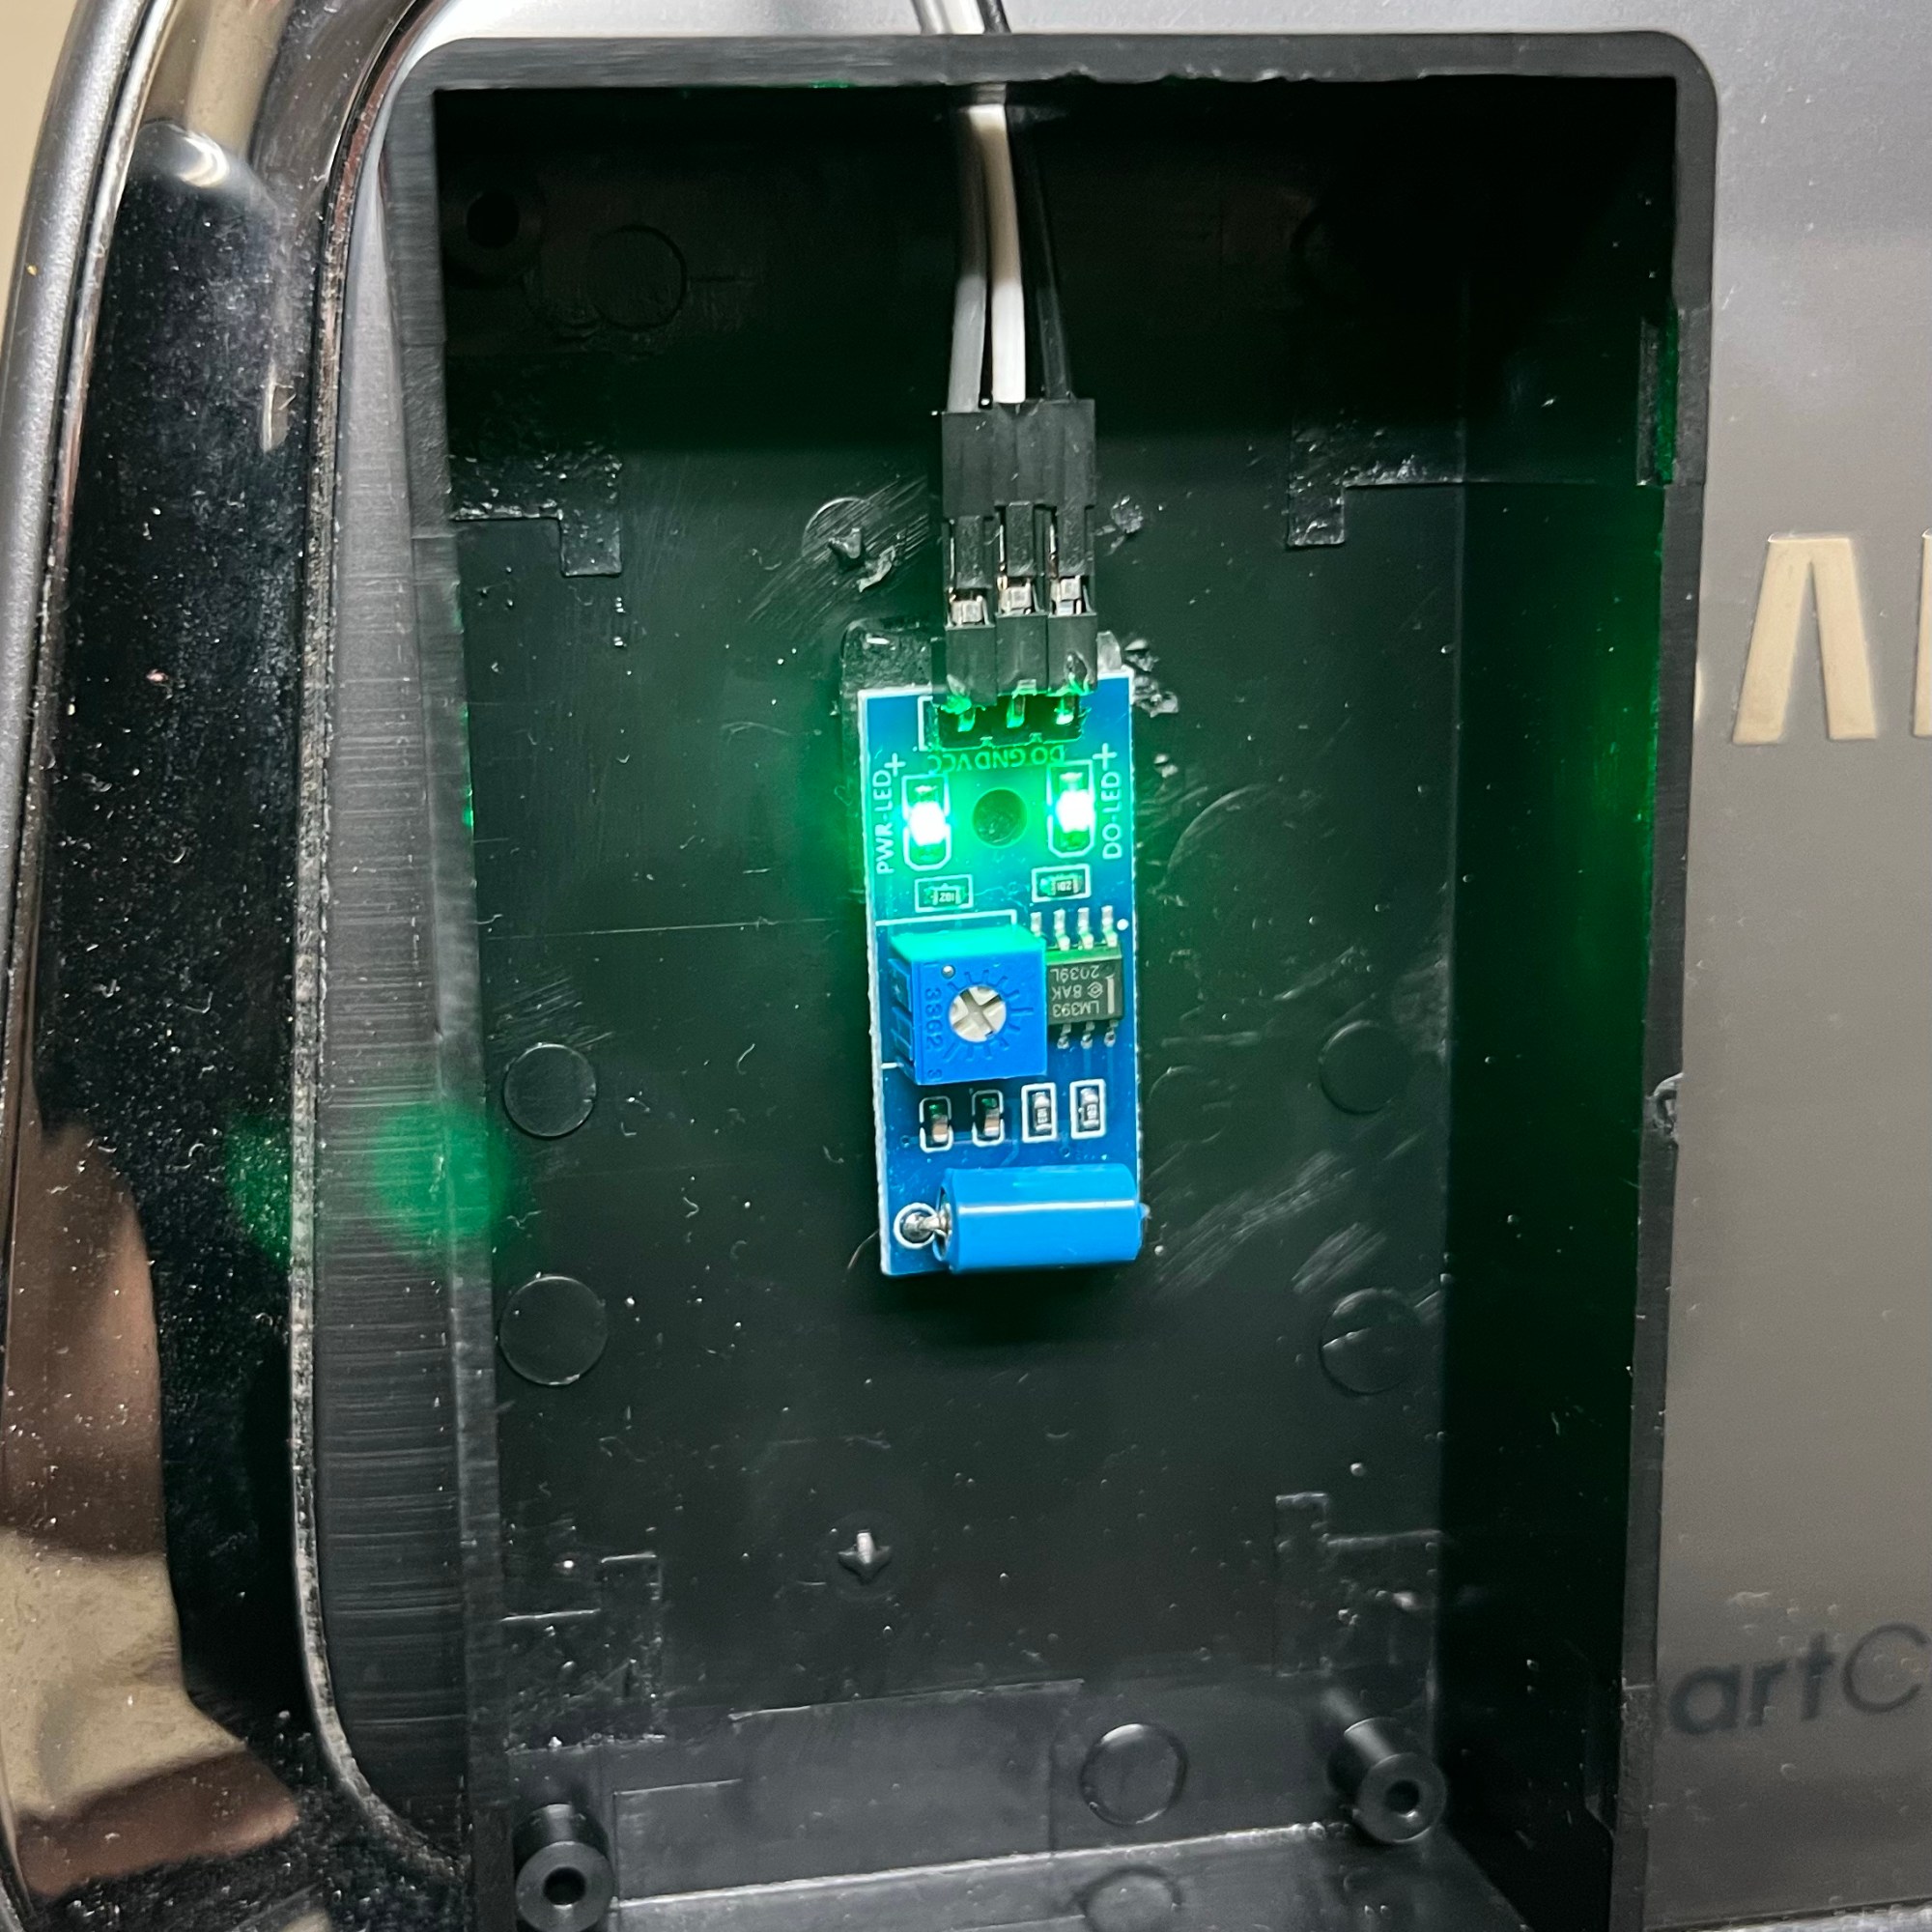
So, back to the drawing board. I found that I couldn’t easily lay hands on a new 801s again, and the project for the Pi4 was now finished, so I had that back. I did find a new vibe sensor – the SW-420. 3 pins instead of 4, but it’s still a digital output that works fine with the Pi, and my existing code worked as-is, so who cares, right? Yeah, I classed the thing up quite a bit more this time too. This time, instead of shoving the Pi inside a project box that’s mounted on the wall running from the SD card, I opted to run in one of those snazzy Argon One M.2 SSD cases booting Ubuntu 22.04 from an M.2 SSD in the basement of the case. I’ve got that sitting on a lovely little shelf mounted just above and behind the dryer, with my 3 GPIO leads running out of the top of the case, directly into the small project box that’s attached to the front of the dryer, inside which is the sensor, which is stuck to the inside of the box using 3M VHB tape. The box itself is stuck to the dryer using VHB tape as well.
In the end, all’s well that ends well. I’ve had to do a good bit more tuning on the SW-420 sensor. It’s been a bit more fiddly than the old 801s was. That one was definitely a plug and play affair. This has required a bit of adjustment on the little potentiometer that’s built into the sensor. Not too bad though. I’ve invested probably a total of 15 minutes of time standing next to the dryer, staring at telemetry, while the dryer is running, or not. But in the end, it’s all working, and the notifications are happening once again.
I, like many, hate DNS. I tolerate it. It’s there because, well, I need it. There’s just only so many IP addresses one can keep rattling around inside one’s head, right? So, it’s DNS.
For years, I ran the old standard, BIND under Linux here at home. My old BIND config did a local forward to dnscrypt-proxy, which ran bound to a port on localhost, and then in turn pushed traffic out to external DNS servers like Cloudflare’s 1.1.1.1 or IBM’s 9.9.9.9. I didn’t think my ISP was entitled to be able to snoop on what DNS lookups I was doing. They still aren’t entitled to those, so I didn’t want to lose that regardless of what I ended up doing.
Out in the real world, my domain’s DNS was hosted by DNS Made Easy. They’ve got a great product. It’s reliable, and it’s not insanely expensive. It’s not nothing, but we’re not talking hundreds a year either. I think it’s about $50 a year for more domains and queries than I could possibly ever use. But, like many old schoolers, they’ve lagged behind the times. Yes, they’ve got things like a nice API, and do support DNSSEC, but DNSSEC is only available in their super expensive plans that start at $1700+ a year. That’s just not happening. So, I started looking around.
I landed on Cloudflare. They’ve got a free tier that fits the bill for me. Plenty of record space, a nice API, dare I say, a nicer API even. DNSSEC included in that free tier at no cost even. How do you beat free? I was using a mish-mash of internal and external DNS with delegated subdomains for internal vs external sites as well. It was (again) complicated – and a pain in the rear.
So, I registered a new domain to use just for private use. I did that through Cloudflare as well. As a registrar, they were nice to work with too. They pass that through at cost. Nice and smooth setup. So, internal stuff now consists of names that are [host/app].site.domain.net. Traefik is setup using the Cloudflare dns-01 letsencrypt challenge to get certs issued to secure it all, and the connectivity, as discussed before in the other post is all by Tailscale. The apps are all deployed using Docker with Portainer. The stacks (ok, they’re just docker-compose files) in Portainer are all maintained in private GitHub repos. I’ll do a post on that in more detail soon.
Ok, so what did I do with the DNS at home? Did I just ditch the resolver in the house entirely? I did not. In the end I opted for dumping BIND after all these years and replacing it with Unbound. I had to do a bit of reading on it, but the configuration is quite a bit less complex, since I wasn’t configuring zone files any more. I was just setting up a small handful of bits like what interfaces did I want to listen to, what did I want my cache parameters to look like, and what did I want to do with DNS traffic for the outside world, which pretty much everything is? In my case, I wanted to forward it to something fast and secured. I was already crushing pretty hard on Cloudflare, so 1.1.1.1 and 1.0.0.1 were easy choices. I’m also using IBM’s 9.9.9.9 as well. All of those are forwarding out using DNS-over-TLS, and DoT, or sometimes DOT. It worked for me first try.
Then I grabbed the Ubuntu certbot snap and told it to grab a cert for dns.home.$(newdomain).net, which is attached to this moon. After I got the cert issued, it was a piece of cake to turn up both DNS over HTTPS and DNS over TLS, and DoH and DoT.
It was fairly easy to get DoH working on a Windows 11 PC. It was also super easy to craft an MDM-style config profile for DoT that works great on IOS and iPadOS devices. Microsoft has Apple beat cold in this department. Well, in the Apple wold, if you configure a profile for DoT (the only way you can get it in there) you’re stuck with it until you get rid of it – by uninstalling and reinstalling.
On Windows? It was as easy as setting your DNS servers to manual, then crack open a command prompt as Administrator and then (assuming your DNS server is 10.10.10.10)…
netsh dns add encryption 10.10.10.10 https://my.great.server/dns-query
Once you’ve done that, you’ll be able to choose from a list under where you punch in DNS settings in the network settings and turn on Encryption for your DNS connection. It’s working great!
I work in networking. I’ve been doing that for a long time now. Along that journey, I’ve also had occasional detours into worlds like generic IT and data security as well. I also do volunteer work at a nonprofit. Plus, like many of you who work in tech, there’s stuff that lives at the home(s) of relatives that you maintain because you’re that sort of person.
Sometimes, you do it cheap, sometimes you do it right, and sometimes you do it somewhere in-between. Like where you’ve got DHCP-assigned WAN interfaces everywhere because everywhere has home-user type Internet services, or less-expensive business-class occasionally. Anyhow, you can’t always count on having the same IP in the same place twice. BUT, you want things to be secured, and you don’t just want wide-open port forwards with plain old Dynamic DNS.
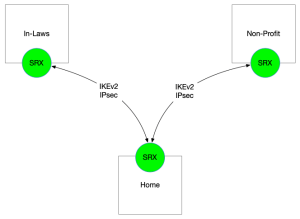
How things used to work, in the IPsec days…
You’ve got some Juniper SRX firewalls you’ve bought for lab work & study previously, you want to make use of them with IPsec VPNs, but to do it right, you really need static IPs. So, what do you do? You fake it. You just pretend you’ve got static IPs on the tunnel endpoints and configure it up. The tunnels come up, you post up your BGP sessions between your st0.0 IFLs, announce some routes, put some reasonable security policies in place. Yes, I did have security policies in there. I was born at night, but it wasn’t last night, guys. But how did I keep it working with IPs changing all the time?
Here’s how I was solving that problem up until fairly recently. I’ve been hacking away at my DNS-o-Matic and DNS Made Easy updaters for a while now. The DME updater was much better, IMHO, as it directly updated a single, private zone that only I ever cared about rather than rely on someone else to sit in the middle and do the updates for me. Plus, I wrote the whole thing from the ground up using DME’s API docs, so I knew exactly how it worked, inside & out. No excuses for it doing anything I didn’t understand, and honestly, I’m really happy with how well it’s been working. It’s been a great opportunity to get better at Python, in particular doing things in a more “Pythonic” way, rather than trying to “just get it done”, or worse, trying to make it work the way I used to do things in Perl or PHP years ago. Is it iconic? Not even close, but it does works pretty darn well.
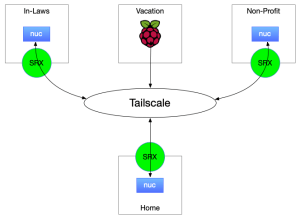
So, with these containers all ran on Intel NUCs under Ubuntu Linux at each site. There were 1 more container on each of these NUCs as part of this operation. I had a set of Telegram Bots that talked to each other as part of this network to inform each other of site IP changes. So, if HOME changed its IP, the bot at HOME sent a message to the group that included the bots for NONPROFIT and INLAWS. Those bots saw note that the IP had changed and they should go find out the new IP of HOME, so they can update their tunnel endpoints. This in turn fired off a function that used the Junos PyEZ API module to update the IPsec tunnel endpoint IPs.
Did it all work? Yes, believe it or not, this actually all worked. Was it pretty fragile and not for the faint of heart? Oh yeah, for sure. Would I recommend doing it? Not a chance. So much so that I’m not even going to share the code, apart from the DDNS updaters. The other stuff is definitely hackjob territory. So, since it was so fragile and had the tendency to break, what did I do? Well, the first few times, I drove and fixed. Which frankly, sucked. After that, I installed an OpenVPN container at each of the locations. Later, I replaced those with linuxserver/wireguard containers. But, after it all broke like twice in about a month, I’d just about had enough. I cried Uncle and decided I was going to look for some other way to do this.
And that’s when my old pal Bhupen mentioned Tailscale to me. I was already into Wireguard. So making it easier, faster, and more useful were all on my short list. Drop the tailscale client on the NUC, get it logged in announcing the local subnet into the tailnet (their name for the VPN instance), making it a “subnet router”, approve the route announcement in the portal and it’s going. I’ve got control over key expiry too. Security policy (naturally) moved from the SRX down to the tailscale gateways, but their ACL language wasn’t too difficult to wrangle. It’s all JSON, so it’s reasonably straightforward.
The new Tailscale VPNs
So, with all the scripts gone and the IPsec stripped away, what’s it all look like? Well, we also added 1 more site into the mix as well – the in-laws vacation place. They bought a place and I stuck a Raspberry Pi up there for future IOT use. Not entirely sure about the “what” yet, but they just updated the HVAC, and it’s all smart stuff, so I expect there will be instrumentation. Maybe something that spits out time series info to Influxdb or somesuch. Who knows? Or Perhaps HomeKit/Homebridge stuff. Time will tell.
In the time since I made the diagrams and wrote this up, things have also changed slightly on the homefront.. I’ve deployed a 2nd subnet router at Home. In the Tailscale docs, they say all over the place not to deploy two subnet routers with the same IP space, and generally speaking, it’s with good reason – traffic destined for those prefixes announced by those routers will be round-robin’d back and forth between them. In my case, since they’re on the same physical subnet, this is essentially ECMP routing, so no big deal. I haven’t validated if they’re really getting the hashing correct, but haven’t really noticed any ill effects yet, so I haven’t shut off the 2nd subnet router yet.
So, by dropping all the BGP sessions, IPsec tunnels, Python scripts, Telegram bots, and Docker containers, things have become much simpler, and much more stable. I’m really happy with Tailscale. So much so that I ended up subscribing at the Personal Pro tier. Great bunch of folks – can’t help but recommend them.
Sometimes there’s data. You’ve got a bunch of it, you need to work out how to represent it in a way that not only makes sense to you, but is also appealing in some fashion. I’m going to talk about a couple of different use cases in this post, each with their own unique data presentations. First, the sensors.
I’ve got a couple of SwitchBot Meter Plus sensors around the house. One is in my office, and the other is in the garage. There isn’t much to them, small little things, battery powered. Pretty much it’s a little monochromatic LCD screen with a temp/humidity sensor and a bluetooth radio. That won’t do, on its own, of course. So, I added SwitchBot’s Hub Mini to the party. It’s a little bridge device that plugs into the house’s AC mains, and has both BT and WiFi radios inside. While I haven’t cracked it open, the device shows up with a MAC address that suggests it’s little more than an ESP32 or ESP8266 microcontroller inside. With the hub in place, connecting the sensors to the SwitchBot cloud, a really important thing happens – the sensors become accessible via SwitchBot’s REST API. So, I’m using some custom-written Python code that runs under Docker to read the sensors. Turns out it was all surprisingly easy to put the pieces together. It was also a pre-cursor to another project I went on to do, where I helped a friend using a similar sensor to control a smart plug to operate a space heater.
So, what does one do with a sensor like this? You read it, naturally. You keep reading it. Over and over at some sort of fixed interval. In my case, I’m reading it every 5 minutes, or 300 seconds, and storing the data in a database. This type of data isn’t particularly well-suited to living in a SQL database like MariaDB, Postgres, etc. This is a job for a time-series database. So, I called on InfluxDB here. It’s relatively small, lightweight, and very well understood. The Python modules for it are pretty mature and easy to work with even, so it was easy to implement as well. Total win. So, read sensor (convert C to F, since I’m a Fahrenheit kind of guy), store in database, sleep(300), do it again. Lather, rinse, repeat. Just keep on doing that for roughly the next, forever. Or until you run out of space or crash. That’s the code right there, in a nutshell.
Sensors Data Visualization
So, what are we visualizing? At the right, you can actually see what I’m graphing. The InfluxData team were nice enough to include some visualization tools right there in the box with InfluxDB, so I’m happy to take advantage of them. Many folks would prefer to use something a bit more flashy and customizable like Grafana, and that’s totally cool. I’ve done it too, even with this same dataset, and the data looks just as good. Heck, probably even looks better, but for me, it was just one more container to have to maintain with little extra value returned. The visualization tools baked into InfluxDB are good enough for what I’m after.
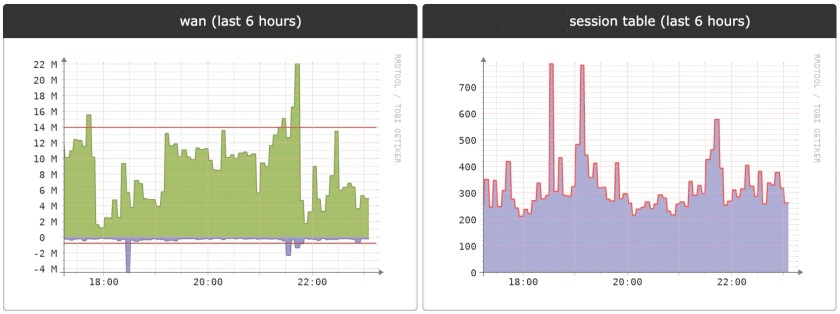
LibreNMS WAN Metrics
Next up? Keeping an eye on what’s up with my WAN router’s Internet-facing link. Here at the homestead, I’m running LibreNMS to keep an eye on things. Nothing nearly as custom here. It’s more off the shelf stuff here. It all runs (again) in Docker containers, and as you’d likely expect, uses SNMP to do the bulk of its monitoring duties. at the right, you can see some sample graphs I’ve got stuck to the dashboard page that give a last 6-hours view of the WAN-facing interface of my Internet router, a Juniper SRX300. You see the traffic report as well as the session table size. Within LibreNMS, I’ve got all sorts of data represented, even graphs of how much toner is left in the printer and the temperature of the forwarding ASIC in the switch upstairs in the TV cabinet. All have their own representations, each unique to the characteristics of the data.
Bottom line? Any time you’re dealing with data visualization, there is no one-size-fits-all. Spend the time with the data to figure out what makes the most sense for you and then make it so!
How many times do you want to bounce a switchport? Ok, it’s not every 5 minutes, I’ll grant you that. But when you need to, you need to. There’s a handful of strategies we can employ to do this.
Firstly, wild-west style. Just walk right up, yank the cable out, count to 10, and shove it back in. Did it work? Did I grab the right cable? Shoot, I hope so. Wait, Juniper starts counting at zero and Cisco starts counting at 1. Oh crap. I pulled the wrong cable. Let’s go back and do it again. Once more, with feeling, and the right cable this time.
Or, we could take the vastly more measured approach of writing up a full MOP, taking it to the Change Control team, getting it approved, scheduling a change window, coordinating with testing teams, double-checking that we’ve got the right cable, then pull it out, count to 10, plug it back in, have the testers verify that everything works correctly, close out the change window, and then go to bed. But that seems slightly excessive, especially if we really need to bounce that port right now, since the thing on the other end’s not responding and we’re troubleshooting because there’s no connectivity.
What if we take the middle-ground? What if we automated the process a bit to lower the risk of some of the human error factors? If we know what port we want to bounce, we can make that happen in a measured, programmatic way through the Junos Python API, which of course, uses NETCONF under the hood.
Enter the Python script I wrote last night. It’s written (naturally) in Python 3, since Python 2 is now EOL, as of a couple of years ago. Seriously gang, if you’re still writing in Python 2, stop. Anyhow, I’m on the road for a couple of days for work, and after a drive last night, and some time stuck in traffic, and some dinner with a work contact, I was just relaxing, and I wrote this.
Yeah, I know, weird way to relax, right? Ok, I had been pondering this the other day, and just sort of threw the idea in the background for processing at a low priority. You know how that goes. Wrote a bit of code, cranked up the VPN back to home, experimented with bouncing the link connected to a Raspberry Pi on the network at home a few times and here we are.
Feed the script a hostname/IP for the switch, (optionally) a username – if you don’t, it will default to whatever your environment resolves for $USER, (optionally) a password – if you don’t, it will expect to be trying to authenticate using SSH keys, and the port you’re looking to shut and turn back up. Using the Junos Python API, the script connects, does an exclusive config lock, disables the port, commits the config, rolls back, commits again, and finally unlocks the config.
At any rate, here it is, in all its splendor… I also copied and pasted most of the same code and at the same time wrote a “PoE Sledgehammer“. It disables PoE on the switch, then rolls back the change. Useful if you need to do something like simultaneously reboot every phone and/or WLAN AP connected to the switch at the same time. As the name implies, it’s kind of a blunt instrument. Use it with caution…
I solved this problem once a couple of years ago using a Wemo smart plug, IFTTT and WhatsApp. Well, fast forward a couple of years, and everything broke. Wemo went and totally broke their IFTTT integration, IFTTT completely changed their model pricing model, and Facebook really changed how they were handling how involved they were (and what level of privacy they were giving to) with WhatsApp. So, given how broken things were, I had to go back to the drawing board.
After a conversation with a guy from work that does a bunch of projects like these, I settled on one of the Etekcity smart plugs from Amazon that uses the VeSync app. These days, these seem harder to come by. If I was going to do this over again, I’d probably do it with a Kasa smart plug and use their local API. Anyhow, the VeSync app also has an unofficial, but pretty well-defined, and stable HTTP API that works really well.
So we’re going to leave IFTTT out of the party this time around, just read directly from the plug’s API, figure out how much power is being used to determine whether or not the washer is running, and once we know the washer has stopped, we alert the family by way of a group text. While in the past this was a group text via WhatsApp, now it’s a message to a Telegram group using a bot. I’ve got no great affinity for Telegram beyond the fact that it’s easy enough to setup the bots and get everyone setup on it.
The bottom line? All of this together enables a pure-Python solution that runs under current Python 3 releases, plays super nicely inside a Docker container, which is how I choose to run it. In essence, the code is pretty simple – turn on the plug, start up an infinite loop where you keep reading power levels. After you change to “ON” state, wait for power to drop below a line, to go back to “OFF” state, at which time you throw out a Telegram message to notify the family that the load in the washer finished up and it’s time to go downstairs and move the wash to the dryer.
This has really been super effective at reminding us to stay on top of the laundry. The number of times that we forget loads in the wash and end up needing to re-wash because stuff got forgotten and ended up getting funky smelling has been slashed down to nothing. Great stuff!


You must be logged in to post a comment.