One of the great things about Junos is the automatic on-box configuration backup and instant rollback, right? Seriously, if you screwed things up in the recent past, you can easily recover by popping into configure mode, rolling back and committing your config. Plus, there’s amazing tools that prevent the walk/drive of shame like commit confirmed that go hand-in-hand. What I would have given all those years ago to have had tools like that in the bag when I was working on other platforms!
All that stuff aside, the on-box stuff is no substitute for long-term archival. Historical records of where system configurations have gone over the course of time is a big deal, operationally speaking. In Cisco-land, one of the old stand-by tools is RANCID. And yes, it works for Junos as well. But what if there was something better? What if there was something a bit more modern that better integrated with an up-to-date toolkit? Enter Oxidized.
Oxidized talks to a bunch of platform types, and outputs a bucket of different formats. You can do simple things like output the latest config as a text file, or you can output git repos either by groups of devices, or a single repo. You can even do things like have the tool perform HTTP POST operations to custom tools you’ve created. Backing up to the git repos for a second… Right along with that, you can have Oxidized push the local repo to a remote git repo as well, be that on the local network, or in the cloud somewhere! On top of all this, in addition to having its own nice web UI, Oxidized has really great integration with LibreNMS (which I use myself in my Homelab).
In the example I’m going to show, I’m going to use the Dockerized version of Oxidized to archive the configuration of my 3x EX2300-C VC at home. It will backup the config to a local git repo as well as push the config to a private GitHub repo. All communication over the network will be secured using SSH with ED25519 keys. No passwords are sent over the network at all! Ready? Let’s get started. I’m going to assume you’ve already got Docker and Docker Compose installed. If you don’t, get that done. There are more guides out there than I can count on that topic, so go ahead and locate one, and come back. 🙂
Ready? Ok, let’s go. I’m going to assume we’re building this on a Linux machine. If you’re not, as always “your mileage may vary”. Please feel free to comment below and contribute any adjustments you had to make to get things cooking on different platforms!
I’ll start by making a directory structure in my home directory where I’ll be working, then setting up my SSH key that the solution will use.
$ mkdir oxidized

$ cd oxidized

$ mkdir oxidized-volume

$ cd oxidized-volume

$ mkdir -p .config/oxidized

$ mkdir .ssh

$ chmod 700 .ssh

$ cd .ssh

$ ssh-keygen -t ed25519 -f id_ed25519 -C oxidized@blog.jasons.org
Generating public/private ed25519 key pair.
Enter passphrase (empty for no passphrase):
Enter same passphrase again:
Your identification has been saved in id_ed25519
Your public key has been saved in id_ed25519.pub
The key fingerprint is:
SHA256:[redacted] oxidized@blog.jasons.org
The key's randomart image is:
+--[ED25519 256]--+
[  also redacted  ]
+----[SHA256]-----+

$ cat id_ed25519.pub
ssh-ed25519 [redacted yet again] oxidized@blog.jasons.org
Next, we’ll create our docker-compose.yaml file in the top-level directory (at the same level as the oxidized-volume directory, above).
---
version: '3'

services:
  oxidized:
    image: oxidized/oxidized:latest
    container_name: oxidized
    tty: true
    volumes:
      - ./oxidized-volume:/home/oxidized
    environment:
      - CONFIG_RELOAD_INTERVAL=3600
    restart: unless-stopped
    networks:
      - oxidized

networks:
  oxidized:
    name: oxidized
    driver: bridge
    attachable: true
    driver_opts:
      com.docker.network.bridge.name: br-oxidized
Next, setup the GitHub Repository. In my case, it’s going to be called jcostom/oxidized, and it will be private. In other words, I’ll be the only one who will be able to see or access the repo. Below, you’ll see the repo settings I chose.

After you’ve created the repo, you’ll need to add your SSH key to the repo. Hit the Settings link on the top row, and on the left side, choose Deployment Keys. Add your SSH key.

Up next, let’s prepare our Junos devices to be backed up by Oxidized. To do this, we’re going to create a fairly restricted user class and a login that Oxidized will use. The authentication method will be… you guessed it! The SSH key we just generated before. So, the set of commands we’ll need to deploy to our Junos devices will look something like this:
set system login class oxidized permissions view-configuration
set system login class oxidized allow-commands "(show)|(set cli screen-length)|(set cli screen-width)"
set system login class oxidized deny-commands "(clear)|(file)|(file show)|(help)|(load)|(monitor)|(op)|(request)|(save)|(set)|(start)|(test)"
set system login class oxidized deny-configuration all
set system login user oxidized class oxidized
set system login user oxidized authentication ssh-ed25519 "ssh-ed25519 [redacted yet again] oxidized@blog.jasons.org"
Ok, so commit that config and you’re ready on the Junos side of things. Now we just need to finish up configuring Oxidized and we’ll be all done! Let’s create our Oxidized config. I won’t go through all the intricacies of this sample config, and yes, I’ll grant you that this is probably slightly more complex than it needs to be. That said, it’s ready to be expanded to accommodate additional system types really easily by adding additional groups and mappings. The 2 files, config and router.db both go in $DIR/oxidized-volume/.config/oxidized.
First, the config file:
---
model: junos
interval: 3600
use_syslog: false
debug: false
threads: 30
timeout: 20
retries: 3
prompt: !ruby/regexp /^([\w.@-]+[#>]\s?)$/
rest: 0.0.0.0:8888
next_adds_job: false
vars:
  auth_methods: [ "publickey" ]
  ssh_keys: "/home/oxidized/.ssh/id_ed25519"
  # log: /home/oxidized/.config/oxidized/oxy.log
groups:
  jnpr:
    username: oxidized
    model: junos
pid: "/home/oxidized/.config/oxidized/pid"
input:
  default: ssh
  debug: false
  ssh:
    secure: false
output:
  default: git
  file:
    directory: "/home/oxidized/.config/oxidized/configs"
  git:
    single_repo: true
    user: oxidized
    email: oxidized@blog.jasons.org
    repo: "/home/oxidized/.config/oxidized/configs.git"
hooks:
  push_to_remote:
    type: githubrepo
    events: [post_store]
    remote_repo: git@github.com:jcostom/oxidized.git
    publickey: /home/oxidized/.ssh/id_ed25519.pub
    privatekey: /home/oxidized/.ssh/id_ed25519
source:
  default: csv
  csv:
    file: "/home/oxidized/.config/oxidized/router.db"
    delimiter: !ruby/regexp /:/
    map:
      name: 0
      model: 1
      group: 2
model_map:
  juniper: junos
Then the router.db file:
myswitch.mydomain.com:juniper:jnpr
We’re just about ready to start things up! The Oxidized Docker container runs as an unprivileged user (hurray!), with both UID and GID 30000. So, we need to set the file ownership. You’ll need to change the ownership of the oxidized-volume and everything below it. The command is: sudo chown -R 30000:30000 oxidized-volume
Finally. We’re ready to start this thing up. There will be one final hiccup though. We’ll get through it. I promise. A final check – this is what your directory structure should look like… I’m going to assume you understand Unix file permissions. The permissions below are pretty basic – nothing crazy.
drwxrwxr-x 30000    30000        4096 Apr 27 11:16 ./oxidized-volume
drwxrwxr-x 30000    30000        4096 Apr 27 09:38 ./oxidized-volume/.config
drwxrwxr-x 30000    30000        4096 Apr 27 11:15 ./oxidized-volume/.config/oxidized
-rw-rw-r-- 30000    30000          36 Apr 27 10:02 ./oxidized-volume/.config/oxidized/router.db
-rw-rw-r-- 30000    30000        1120 Apr 27 10:06 ./oxidized-volume/.config/oxidized/config
drwx------ 30000    30000        4096 Apr 27 11:16 ./oxidized-volume/.ssh
-rw-r--r-- 30000    30000         106 Apr 27 10:21 ./oxidized-volume/.ssh/id_ed25519.pub
-rw------- 30000    30000         419 Apr 27 10:21 ./oxidized-volume/.ssh/id_ed25519
-rw-rw-r-- jcostom   jcostom       435 Apr 27 09:38 ./docker-compose.yaml
Ready to launch? Let’s Gooooooo! Get into that top level directory where your docker-compose.yaml file is and run the command docker-compose up. Provided you followed all the steps in order, and everything’s working, the oxidized/oxidized:latest image got pulled from DockerHub and launched per what’s in your Compose file. The first time you run things, you’re going to see an error that says Rugged::SshError: invalid or unknown remote ssh hostkey. That’s because the image doesn’t have the GitHub SSH key stored. We’re going to fix that though! Get to another terminal window and run this command: docker exec -it -u 30000:30000 oxidized /bin/bash
That’s going to drop you into a bash shell inside the Oxidized container. The first time out, we’re going to manually push to GitHub. Ready to fix it? Here goes.
cd ~/configs.git
git push --set-upstream origin master
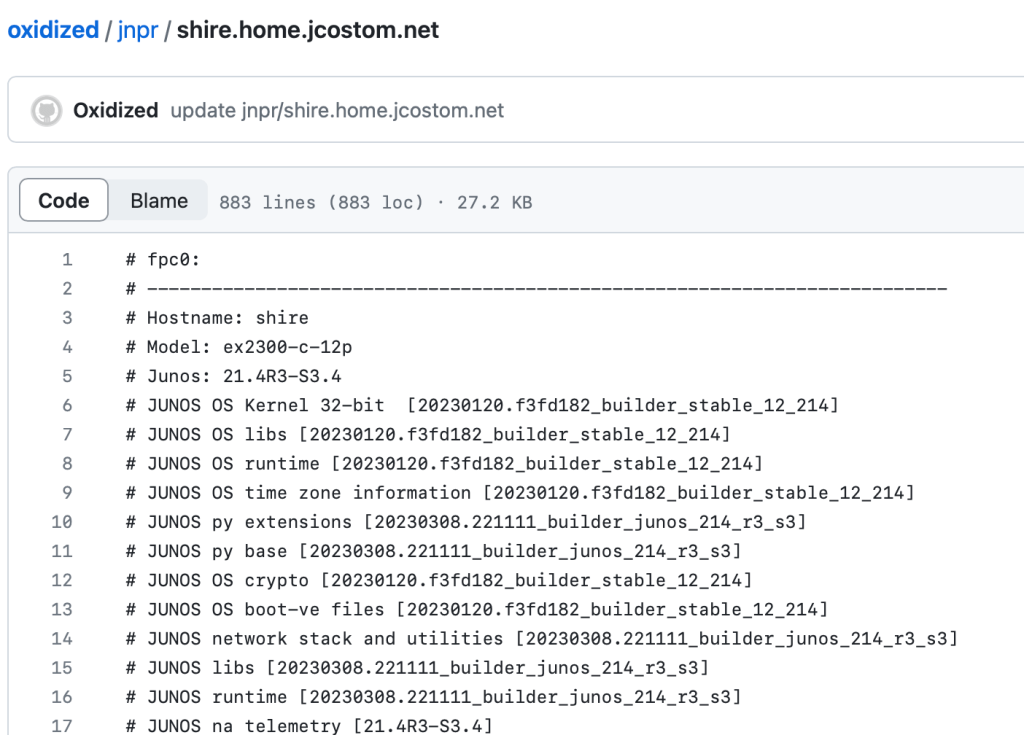
You’ll get asked about accepting the SSH key, you’ll (naturally) say yes, the push will work, and you’re done. You can exit that shell with a Control+D. You can check the repo to see the push was successful. Here’s what mine looks like after that first push.
Guess what? You’re all done! You’ll probably want to hit Control+C in that Docker Compose session, and restart with a docker-compose up -d, which will start the services in the background, rather than the foreground. Every hour, Oxidized will poll your systems to see if the configs have changed. If so, the config will be backed up and pushed out to your private GitHub repo.
With the GitHub UI being as good as it is, you can probably see why I don’t bother with the Oxidized Web UI. Between it and the integration with LibreNMS, I simply have no real need for yet another way to consume the tool!


You must be logged in to post a comment.