Ok, so we’re going to take a break from our usual geekery to talk about watching TV without having a traditional Cable TV subscription. There’s this recurring discussion that keeps happening on our town Facebook group and I keep ending up going through parts of what I’m writing here.

My mind was absolutely blown this morning when I saw a picture of one person’s FiOS bill. It’s shown at the right. So that’s almost $2600/year.
Many folks will suggest you just go with Internet-only packages and a streaming service like YouTube TV, Hulu Live TV, Sling, or whatever, with Smart TVs or set-top devices like Apple TV, Roku, or Fire TV, and it’s tough to argue with the simplicity of that solution. It’s pretty much a turnkey and go type of solution. Plug it all in, turn it on, login and you’re watching TV in a few minutes, even local channels with sports. Checking out our neighbor’s use case here and substituting in what many in town are paying, she could move to an Internet-only plan for about $75 a month, and use one of the many streaming services for about $55-65/month, depending on who you picked, and you just turned $2600 a year into $1700 a year. What could you do with an extra $900 in your budget? Only thing though, we made some assumptions here, like equipment – we’re assuming that you’ve got all Smart TVs that have the ability to accommodate whatever streaming service(s) you’re planning to use. Otherwise, you’re buying a device to hook up to the TV. That’s going involve some up-front cost, which will eat into that $900, at least for the first year.
The solution I’ve built out at our house involves more up-front expense, but involves no recurring costs apart from our normal Internet access costs. In our case, this is the Verizon FiOS Gigabit plan. We’ve had FiOS Internet since we moved into our current house, about 15 years ago, back when it was 25/5 service. How the times have changed!
We’ve got a roof-mounted antenna that we installed a couple of years ago when we made the big switch. Not being the “climbing on the roof” type, I contracted this part out. I found a local company that did the job, including the antenna (a Channel Master CM-3016, now called the Advantage 45). Rather than connecting to a TV, the antenna is connected to a networked TV tuner device. In our case, we’re using an HD HomeRun (an HDHomeRun Connect 4K). This unit has 4 digital/ATSC tuners, 2 of which are ATSC 3.0 capable, and connected to our network using a wired Ethernet cable (not WiFi). ATSC 3.0 is the new standard that’s rolling out that supports 4K over-the-air broadcast TV.
So, that’s got local TV signal from the airwaves into the house and onto our network! How do we watch it? There are a couple of ways. SiliconDust (the folks who make the HDHomeRun box) offer apps for the major streaming devices and Smart TVs that let you access the device, decide what channel to tune, watch TV, even pause live TV. What’s not there though is all the DVR capabilities you’d want to have. No ability to record shows. So let’s talk about how I’m getting that.
To get DVR functions. I’m using the Plex Media Server. I’m running Plex on a custom-built server on our network that runs the Ubuntu Linux operating system, with our media files stored on a Synology Network Attached Storage array. We’re using the Network File System (or NFS, if you’re a Unix type) to mount the drive on the Plex system from the NAS. It works really well. Plex has great support for the HD HomeRun devices too. You go into the Plex settings, tell it to take a look around your network, it finds the tuner, scans for available channels, you pick the ones you want to make available, then Plex goes and grabs guide data, just like you’re probably used to having on a cable box.
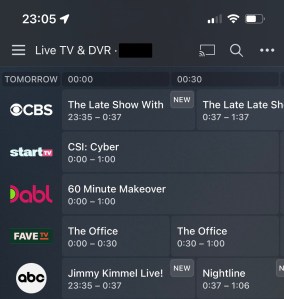
Once you’ve reached this point, you’ve got access to a pretty normal looking programming guide, and even have familiar looking DVR features like recording single episodes, or all upcoming episodes. If you decide to do the latter, you’ve got even more options at your disposal, like the ability to record only new episodes, or choose how many episodes to retain, how long to retain episodes, if you prefer HD episodes, or only want HD episodes. Maybe you only want to record from a specific channel, or only at a certain time. Those options are useful when it’s a show that’s syndicated and on multiple channels at multiple times. Then there’s extra fun stuff like built-in channel skip. You can mark for channel skip or let Plex take the wheel and try its hand at just chopping the commercials out totally on its own. I’ve had a mix of experiences both good and bad letting it go on its own. Sometimes it’s great, and other times, I’ve missed Final Jeopardy during a tight match. So, I don’t typically go beyond “Mark for Skip”. Honestly, it’s pretty accurate.
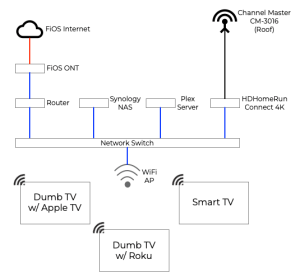
So, now that I’ve described how the bits fit together, let’s actually take a look at a diagram (Click to enlarge). It’s more of a logical diagram, really. I work in networking, so I prefer to keep network elements like my routers, switches and WiFi Access Points separated, so those are all individual pieces in our house. In yours, they’re probably not. You may be used to a converged device that’s a Router/Switch/and WiFi Access Point all-rolled-into-one, and that’s alright. You do you! But, this is how I’ve built what we’ve got. The different colors indicate different types of connections. Black is the coax from the antenna to the HD HomeRun. Red is the fiber optic cable from the street the Verizon Optical Network Terminal (aka ONT) on the side of the house (in real life, it’s probably yellow, but yellow on a white background? really hard to see!). Blue is plain old Ethernet cable.
So, if you were going to build something like this, what would you want to buy, what would it cost, and when would you start saving money compared to getting taken to the cleaners by Verizon? Great questions. The answers really depend on what you like to watch for TV. If all you watch are local network shows, you’ll recoup your investment in about a year. If you watch other stuff, it might take longer. If your mobile phone plan includes streaming services for free, as many do, that’s a bonus. For example, we’re a T-Mobile house. We get free Netflix thrown in with our family plan. Some Verizon customers get Disney+ for free. There are tons of deals from carriers, figure out what works best for you and exploit it to your advantage.
If you want a simpler more “turnkey” type experience, I’d suggest you look toward the Synology NAS as a solution. Plex runs on Synology, works great, and your storage is built right in there. There are trade-offs, but honestly, if you’re savvy enough to know that you’re impacted by those trade-offs, you’ll also know if the value proposition is there for you to spend more to work around it. You could shave some $$ by building your own small server out of something like a BeeLink Mini PC, available from Amazon, install something like Ubuntu Linux on there and run Plex on it yourself, but there’s a much steeper learning curve involved in that path.
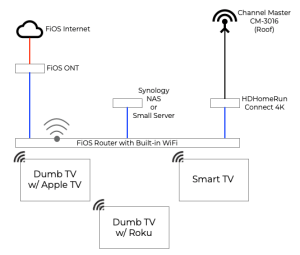
If you’re interested in pursuing this idea, check out the diagram at the right for the view of the simplified version of what we’re running at our house. You’ll note the use of the Verizon-provided FiOS router, and the Synology NAS, or the small server. But the rest is pretty much the same. Now of course, you don’t have to use that same Channel Master antenna I did, but I’m here to tell you that it’s pretty difficult to beat their performance, especially at their price point. Speaking of price points… On to what you’ve all been waiting for. The numbers. First, some assumptions I made in my analysis… I looked at my neighbor’s use case up above. 7 TVs, with a DVR requirement. I kicked the Internet speed up from 200M to Gigabit using what I’m paying per month on the autopay discount to do the cost modeling. The full comparison is a 3-Year Total Cost of Ownership (TCO) Model. First up, building with the Synology NAS, with redundant 6TB of redundant storage, then the Small Server build, followed by keeping the FiOS Triple Play Bundle at $214.99 a month. That’s the easiest one to calculate, of course, since it’s just 36 months of service at $214.99.
| Item | Link | Unit Price | Qty | Total |
| NAS | https://smile.amazon.com/dp/B087Z6SNC1 | $399.99 | 1 | $399.99 |
| Hard Drives | https://smile.amazon.com/dp/B085Z4P89R | $129.99 | 2 | $259.99 |
| Plex Software | https://www.plex.tv/plex-pass/ | $119.99 | 1 | $119.99 |
| Antenna w/Install | NJ-based Installer Company I used | $250.00 | 1 | $250.00 |
| HD HomeRun | https://smile.amazon.com/dp/B092GCN9NL | $199.99 | 1 | $199.99 |
| Roku Stick 4K+ | https://smile.amazon.com/dp/B09BKCQYRN | $69.00 | 7 | $483.00 |
| FiOS Gigabit | $75.00 | 12 | $900.00 | |
| $2612.95 |
| Item | Link | Unit Price | Qty | Total |
| BeeLink U59 | https://smile.amazon.com/dp/B09H5QXS6K | $250.00 | 1 | $250.00 |
| 2TB SSD | https://smile.amazon.com/dp/B089C6LZ42 | $187.66 | 1 | $187.66 |
| Plex Software | https://www.plex.tv/plex-pass/ | $119.99 | 1 | $119.99 |
| Antenna w/Install | NJ-based Installer Company I used | $250.00 | 1 | $250.00 |
| HD HomeRun | https://smile.amazon.com/dp/B092GCN9NL | $199.99 | 1 | $199.99 |
| Roku Stick 4K+ | https://smile.amazon.com/dp/B09BKCQYRN | $69.00 | 7 | $483.00 |
| FiOS Gigabit | $75.00 | 12 | $900.00 | |
| $2,391.74 |

As you can see in the graph shown at the right, the Small Server and the Synology NAS builds are quite close in the 3-Year TCO model, landing about $200 apart across the entire time. Given this, unless you’ve got serious reasons to pursue the Small Server route, I’d recommend going down the Synology NAS route. You get built-in drive redundancy, more storage space, and a turnkey web-driven management interface that falls out of the box ready to go.
Please, don’t forget, there’s also nothing wrong with just simply dropping the Triple-Play and picking up a streaming TV service. You’re going to cut your monthly expenses in half here. But, if you want to go deeper, and learn a few things along the way, you can. This is the way.

You must be logged in to post a comment.